JUnit源码解析
JUnit是由 Erich Gamma 和 Kent Beck 编写的一个回归测试框架,以Eclipse、IDEA等为代表的Java开发环境都对JUnit提供了非常友善的支持。提到Erich Gamma,他就是大名鼎鼎的
《设计模式:可复用面向对象软件的基础》一书的作者之一。因此,JUnit当中的设计模式的运用相当得当,所以,JUnit的源码可谓相当优良的一本武林秘籍,非常值得一看。 本文基于JUnit4.12,将从JUnit的运行流程,Match验证,两个方面,来对JUnit的源码进行整体的分析。
运行流程
JUnit的启动方式有很多,比如在Android Studio中我们可以直接点击某个被@Test注解的函数来运行:
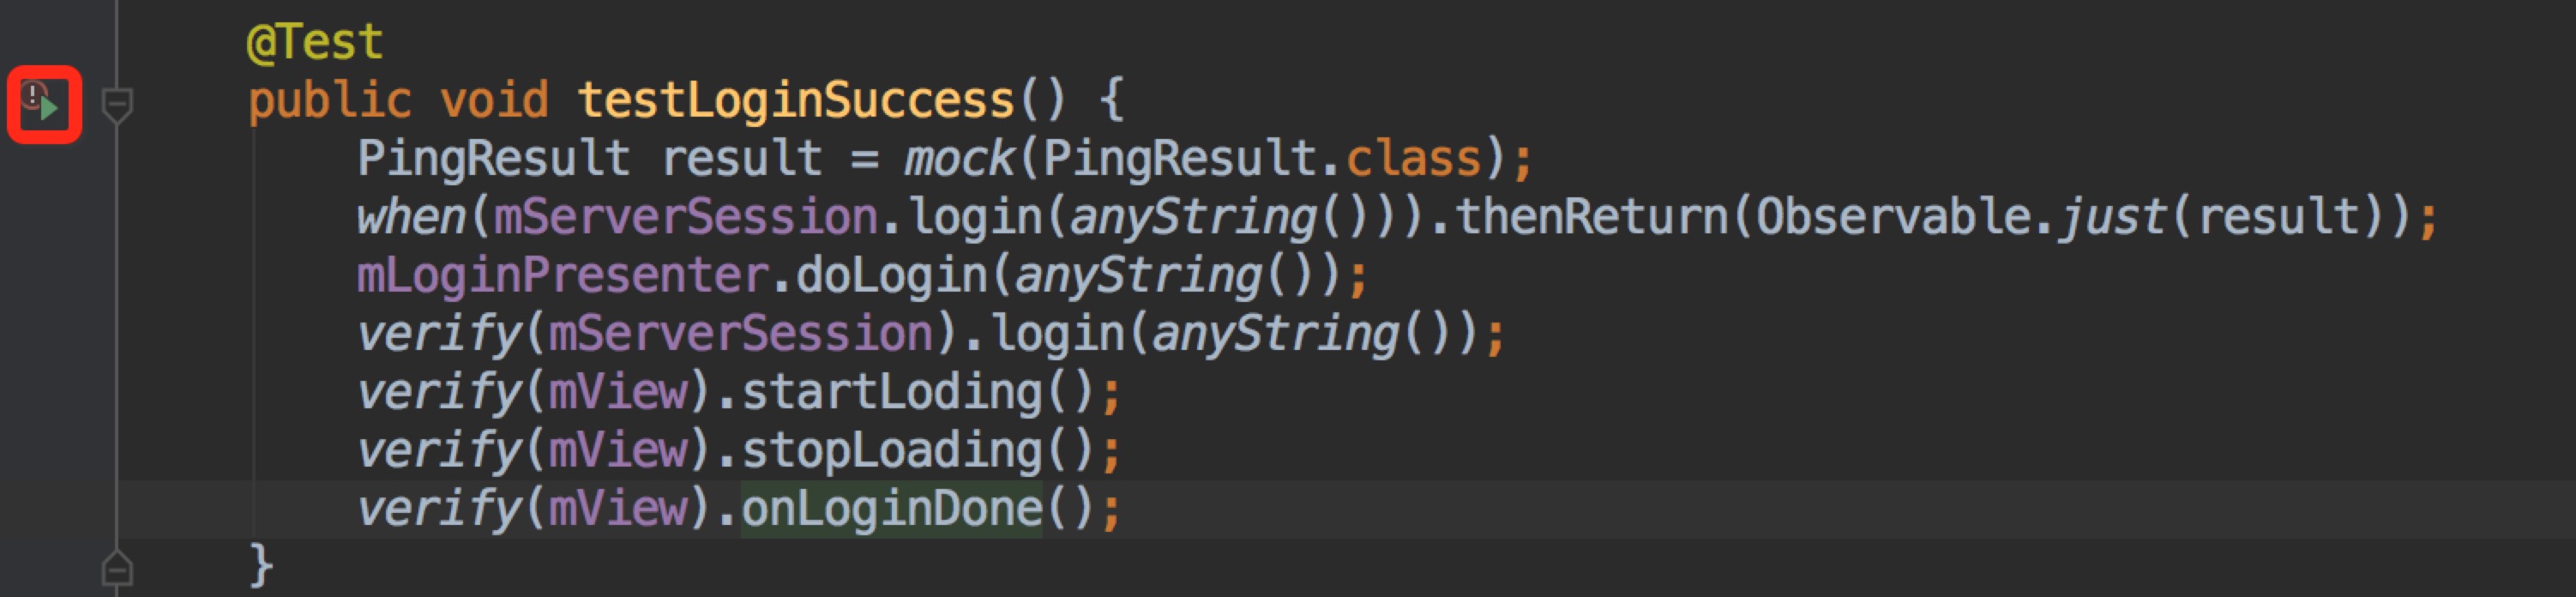
此时,启动的是JUniteStarter,该类是intellij为我们提供的。感兴趣可以查看其源码: https://github.com/JetBrains/intellij-community/blob/master/plugins/junit_rt/src/com/intellij/rt/execution/junit/JUnitStarter.java
如果我们使用gradle, 可以执行gradle test运行测试,实际上是在一个线程中执行SuiteTestClassProcessor的processTestClass方法来进行启动。其源码可以查看https://github.com/gradle/gradle/blob/master/subprojects/testing-base/src/main/java/org/gradle/api/internal/tasks/testing/SuiteTestClassProcessor.java
如上两种都是第三方工具为我们提供的便捷方式,实际上JUnit也提供了一个名为JUnitCore的类来供我们方便的运行测试用例。
尽管启动JUnit的方式有很多,但这都是打开与JUnit对话的一些方式,最终执行的还是JUnit当中的起到核心作用的一些类,为了让大家对这些核心boss有一个初步了解,我画了一个类图:
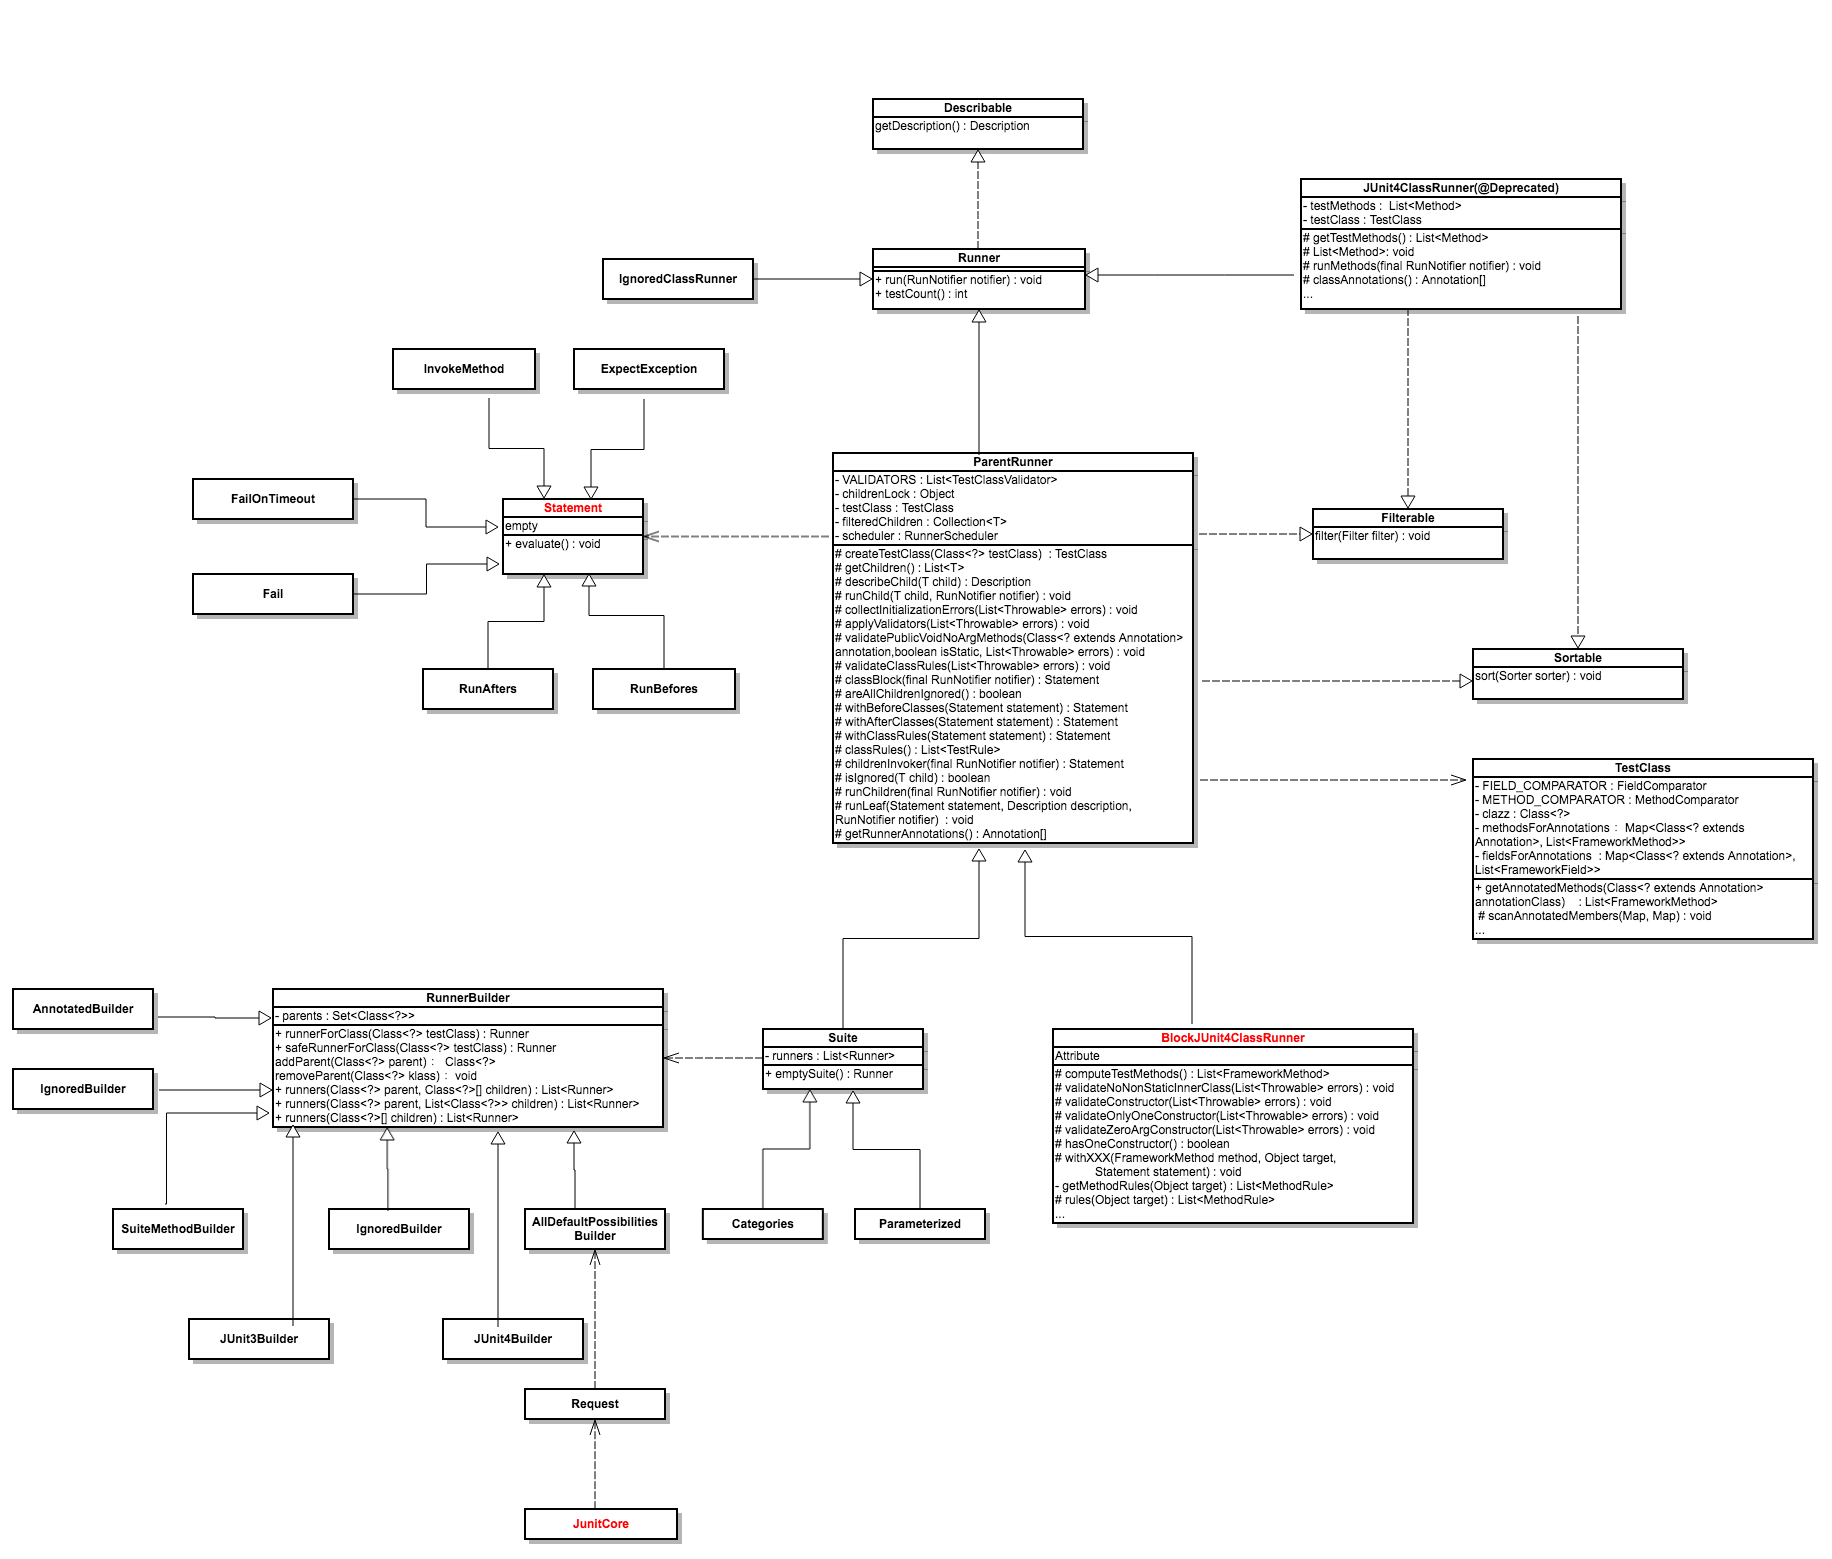
上图中仅是JUnit中的几个核心的类,也是本分主要分析的对象。这里先给出一些对象的职责,可以有个大体的了解,后面会通过代码就会更清楚每个对象是如何完成这些职责的:
- 在类图的中央,有个叫做ParentRunne的对象很引人注目,它继承自Runner.
- Runner则表示着JUnit对整个测试的抽象
- Runner实现了Describable接口,Describable接口中唯一的函数
getDescription()返回了Description对象,记录着测试的信息。 - Statement 是一个抽象类,其 evaluate()函数代表着在测试中将被执行的方法。
- ParentRunner 共有两个子类,BlockJUnit4ClassRunner 用来运行单个测试类,Suite用来一起运行多个测试类
- RunnerBuilder 是生产Runner的策略,如使用
@RunWith(Suite.class)标注的类需要使用Suite, 被@Ignore标注的类需要使用IgnoreClassRunner。 - TestClass是对被测试的类的封装
综上,我们先从ParentRunner看起,其构造函数如下:
protected ParentRunner(Class<?> testClass) throws InitializationError {
    this.testClass = createTestClass(testClass);
    validate();
}
this.testClass即前文所说的TestClass,我们进入createTestClass方法来查看其如何将class对象转换为TestClass。
protected TestClass createTestClass(Class<?> testClass) {
        return new TestClass(testClass);
}
并没什么东西,具体的逻辑都写在TestClass的内部:
public TestClass(Class<?> clazz) {
    this.clazz = clazz;
    if (clazz != null && clazz.getConstructors().length > 1) {
        throw new IllegalArgumentException(
                "Test class can only have one constructor");
    }

    Map<Class<? extends Annotation>, List<FrameworkMethod>> methodsForAnnotations =
            new LinkedHashMap<Class<? extends Annotation>, List<FrameworkMethod>>();
    Map<Class<? extends Annotation>, List<FrameworkField>> fieldsForAnnotations =
            new LinkedHashMap<Class<? extends Annotation>, List<FrameworkField>>();

    scanAnnotatedMembers(methodsForAnnotations, fieldsForAnnotations);

    this.methodsForAnnotations = makeDeeplyUnmodifiable(methodsForAnnotations);
    this.fieldsForAnnotations = makeDeeplyUnmodifiable(fieldsForAnnotations);
}
可以看到,整个构造函数大致都在做一些验证和初始化的工作,需要引起我们注意的应该是scanAnnotatedMembers方法:
 protected void scanAnnotatedMembers(Map<Class<? extends Annotation>, List<FrameworkMethod>> methodsForAnnotations, Map<Class<? extends Annotation>, List<FrameworkField>> fieldsForAnnotations) {
       for (Class<?> eachClass : getSuperClasses(clazz)) {
            for (Method eachMethod : MethodSorter.getDeclaredMethods(eachClass)) {
                addToAnnotationLists(new FrameworkMethod(eachMethod), methodsForAnnotations);
            }
            // ensuring fields are sorted to make sure that entries are inserted
            // and read from fieldForAnnotations in a deterministic order
            for (Field eachField : getSortedDeclaredFields(eachClass)) {
                addToAnnotationLists(new FrameworkField(eachField), fieldsForAnnotations);
            }
      }
}
整个函数的作用就是扫描class中方法和变量上的注解,并将其根据注解的类型进行分类,缓存在methodsForAnnotations与fieldsForAnnotations当中。需要注意的是,JUnit对方法和变量分别封装为FrameworkMethod与FrameworkField,它们都继承自FrameworkMember,这样就为方法和变量进行了统一抽象。
看完了ParentRunner的构造函数,我们来看ParentRunner继承自Runner的run方法是如何工作的:
@Override
public void run(final RunNotifier notifier) {
     EachTestNotifier testNotifier = new EachTestNotifier(notifier,
             getDescription());
     try {
         Statement statement = classBlock(notifier);
         statement.evaluate();
     } catch (AssumptionViolatedException e) {
         testNotifier.addFailedAssumption(e);
     } catch (StoppedByUserException e) {
         throw e;
     } catch (Throwable e) {
         testNotifier.addFailure(e);
     }
}
其中比较关键的代码是classBlock函数将notifier转换为Statement:
protected Statement classBlock(final RunNotifier notifier) {
     Statement statement = childrenInvoker(notifier);
     if (!areAllChildrenIgnored()) {
         statement = withBeforeClasses(statement);
         statement = withAfterClasses(statement);
         statement = withClassRules(statement);
     }
     return statement;
}
继续追进childrenInvoker之前,允许我现在这里先存个档,记为A,一会我们会回到classBlock这里
protected Statement childrenInvoker(final RunNotifier notifier) {
        return new Statement() {
            @Override
            public void evaluate() {
                runChildren(notifier);
            }
        };
    }
childrenInvoker返回的是一个Statement,看它的evaluate方法,其调用的是runChildren方法,这也是ParentRunner中非常重要的一个函数:
private void runChildren(final RunNotifier notifier) {
    final RunnerScheduler currentScheduler = scheduler;
    try {
         for (final T each : getFilteredChildren()) {
               currentScheduler.schedule(new Runnable() {
                    public void run() {
                        ParentRunner.this.runChild(each, notifier);
                    }
               });
         }
     } finally {
         currentScheduler.finished();
     }
}
这个函数就体现了抽象的重要性,注意泛型T,它在ParentRunner的每个实现类中各不相同,在BlockJUnit4ClassRunner中T表示FrameworkMethod,具体到这个函数来讲getFilteredChildren拿到的是被@Test注解标注的FrameworkMethod,而在Suite中,T为Runner,而ParentRunner.this.runChild(each, notifier);这句的中的runChild(each, notifier)方法依旧是个抽象方法,我们先看BlockJUnit4ClassRunner中的实现:
@Override
protected void runChild(final FrameworkMethod method, RunNotifier notifier) {
     Description description = describeChild(method);
     if (isIgnored(method)) {
         notifier.fireTestIgnored(description);
     } else {
         runLeaf(methodBlock(method), description, notifier);
     }
}
isIgnored方法判断了method方法是否被@Ignore注解标识,如果是的话则直接通知notifier触发ignored事件,否则,执行runLeaf方法, runLeaf的第一个参数是Statement,所以,BlockJUnit4ClassRunner通过methodBlock方法将method转换为Statement:
protected Statement methodBlock(FrameworkMethod method) {
        Object test;
        try {
            test = new ReflectiveCallable() {
                @Override
                protected Object runReflectiveCall() throws Throwable {
                    return createTest();
                }
            }.run();
        } catch (Throwable e) {
            return new Fail(e);
        }

        Statement statement = methodInvoker(method, test);
        statement = possiblyExpectingExceptions(method, test, statement);
        statement = withPotentialTimeout(method, test, statement);
        statement = withBefores(method, test, statement);
        statement = withAfters(method, test, statement);
        statement = withRules(method, test, statement);
        return statement;
 }
前面的几行代码是在生成test 对象,而test对象的类型则是我们待测试的class,接下来追进methodInvoker方法:
protected Statement methodInvoker(FrameworkMethod method, Object test) {
        return new InvokeMethod(method, test);
}
可见,我们生成的Statement实例为InvokeMethod,我们看下其evaluate方法:
testMethod.invokeExplosively(target);
invokeExplosively函数做的事情就是对target对象调用testMethod方法。而前面我们说过,这个testMethod在BlockJUnit4ClassRunner中就是被@Test所标注的方法,此时,我们终于找到了@Test方法是在哪里被调用的了。别急,我们接着刚才的函数继续分析:
statement = possiblyExpectingExceptions(method, test, statement);
statement = withPotentialTimeout(method, test, statement);
statement = withBefores(method, test, statement);
statement = withAfters(method, test, statement);
statement = withRules(method, test, statement);
我们可以看到,statement不断的在变形,而通过withBefores,withRules这些函数的名字我们可以很容易猜到,这里就是在处理@Before,@Rule等注解的地方,我们以withBefores为例:
protected Statement withBefores(FrameworkMethod method, Object target,
            Statement statement) {
        List<FrameworkMethod> befores = getTestClass().getAnnotatedMethods(
                Before.class);
        return befores.isEmpty() ? statement : new RunBefores(statement,
                befores, target);
}
这个函数里首先拿到了所有被@Before标注的方法,将其封装为RunBefores,我们看下其构造函数和
public RunBefores(Statement next, List<FrameworkMethod> befores, Object target) {
        this.next = next;
        this.befores = befores;
        this.target = target;
}

public void evaluate() throws Throwable {
       for (FrameworkMethod before : befores) {
            before.invokeExplosively(target);
       }
       next.evaluate();
}
很是明了,evaluate执行时,首先将before方法全部invoke来执行,然后才调用原始statement的evaluate方法。其余几个函数与此类似,感兴趣可以继续查看。
如此,我们就明白了runLeaf方法的第一个参数Statement的由来,接下来就看下这个runLeaf方法做了什么,runLeaf在ParentRunner中有默认的实现:
 protected final void runLeaf(Statement statement, Description description,
            RunNotifier notifier) {
        EachTestNotifier eachNotifier = new EachTestNotifier(notifier, description);
        eachNotifier.fireTestStarted();
        try {
            statement.evaluate();
        } catch (AssumptionViolatedException e) {
            eachNotifier.addFailedAssumption(e);
        } catch (Throwable e) {
            eachNotifier.addFailure(e);
        } finally {
            eachNotifier.fireTestFinished();
        }
}
非常简单,直接执行了statement的evaluate方法,需要注意的是这里的statement实例不一定是什么了,有可能是RunBefores,也有可能是RunAfters,这就和被测试类中的注解有关了。
讲到这里,还记得前面我们说过的存档A吗?我们回到存档A:
protected Statement classBlock(final RunNotifier notifier) {
     Statement statement = childrenInvoker(notifier);
     if (!areAllChildrenIgnored()) {
         statement = withBeforeClasses(statement);
         statement = withAfterClasses(statement);
         statement = withClassRules(statement);
     }
     return statement;
}
刚刚存档后所发生的一起,其实就是在执行Statement statement = childrenInvoker(notifier)这个代码。换句话说,childrenInvoker的作用就是将所有需要执行的测试用例用一个Statement封装起来。进而点燃这个Statement,就会触发所有的测试用例。但同样需要注意到被if语句包围的代码,我们又看到了熟悉的语句,Statement还在被不断的转换,但此时是在类的层面,withBeforeClasses函数操作的就是@BeforeClass注解了:
protected Statement withBeforeClasses(Statement statement) {
        List<FrameworkMethod> befores = testClass
                .getAnnotatedMethods(BeforeClass.class);
        return befores.isEmpty() ? statement :
                new RunBefores(statement, befores, null);
}
需要注意的是这回RunBefores的第三个参数为null,说明被@BeforeClass注解的方法只能是static的。
如上,我们分析了BlockJUnit4ClassRunner的运行流程,也就是说当测试类为一个的时候JUnit是如何工作的。前文也提到过,ParentRunner还有一个子类Suite,表示需要运行一组测试,BlockJUnit4ClassRunner的一个运行单元为FrameworkMethod,而Suite的一个运行单元为Runner,我们看其runChild方法:
protected void runChild(Runner runner, final RunNotifier notifier) {
    runner.run(notifier);
}
很是明了,直接滴啊用runner的run方法。这样,如果这个runner的实例仍然是Suite,则会继续向里运行,如果这个runner为BlockJUnit4ClassRunner,这执行我们前面分析的逻辑。这里有个问题是,那这个runner是如何生成的呢?这就要看Suite的构造函数:
protected Suite(Class<?> klass, Class<?>[] suiteClasses) throws InitializationError {
        this(new AllDefaultPossibilitiesBuilder(true), klass, suiteClasses);
}
AllDefaultPossibilitiesBuilder的职责就是为每个类生找到对应的Runner,感兴趣可以查看其runnerForClass方法,比较容易理解,这里就不再赘述。
Matcher验证
上面我们分析了用@Test标注的函数是如何被JUnit执行的,但单单有@Test标注是肯定不够的,既然是测试,我们肯定需要一定的手段来验证程序的的执行是符合预期的。JUnit提供了Matcher机制,可以满足我们大部分的需求。Matcher相关类主要在org.hamcrest包下,先来看下类图:
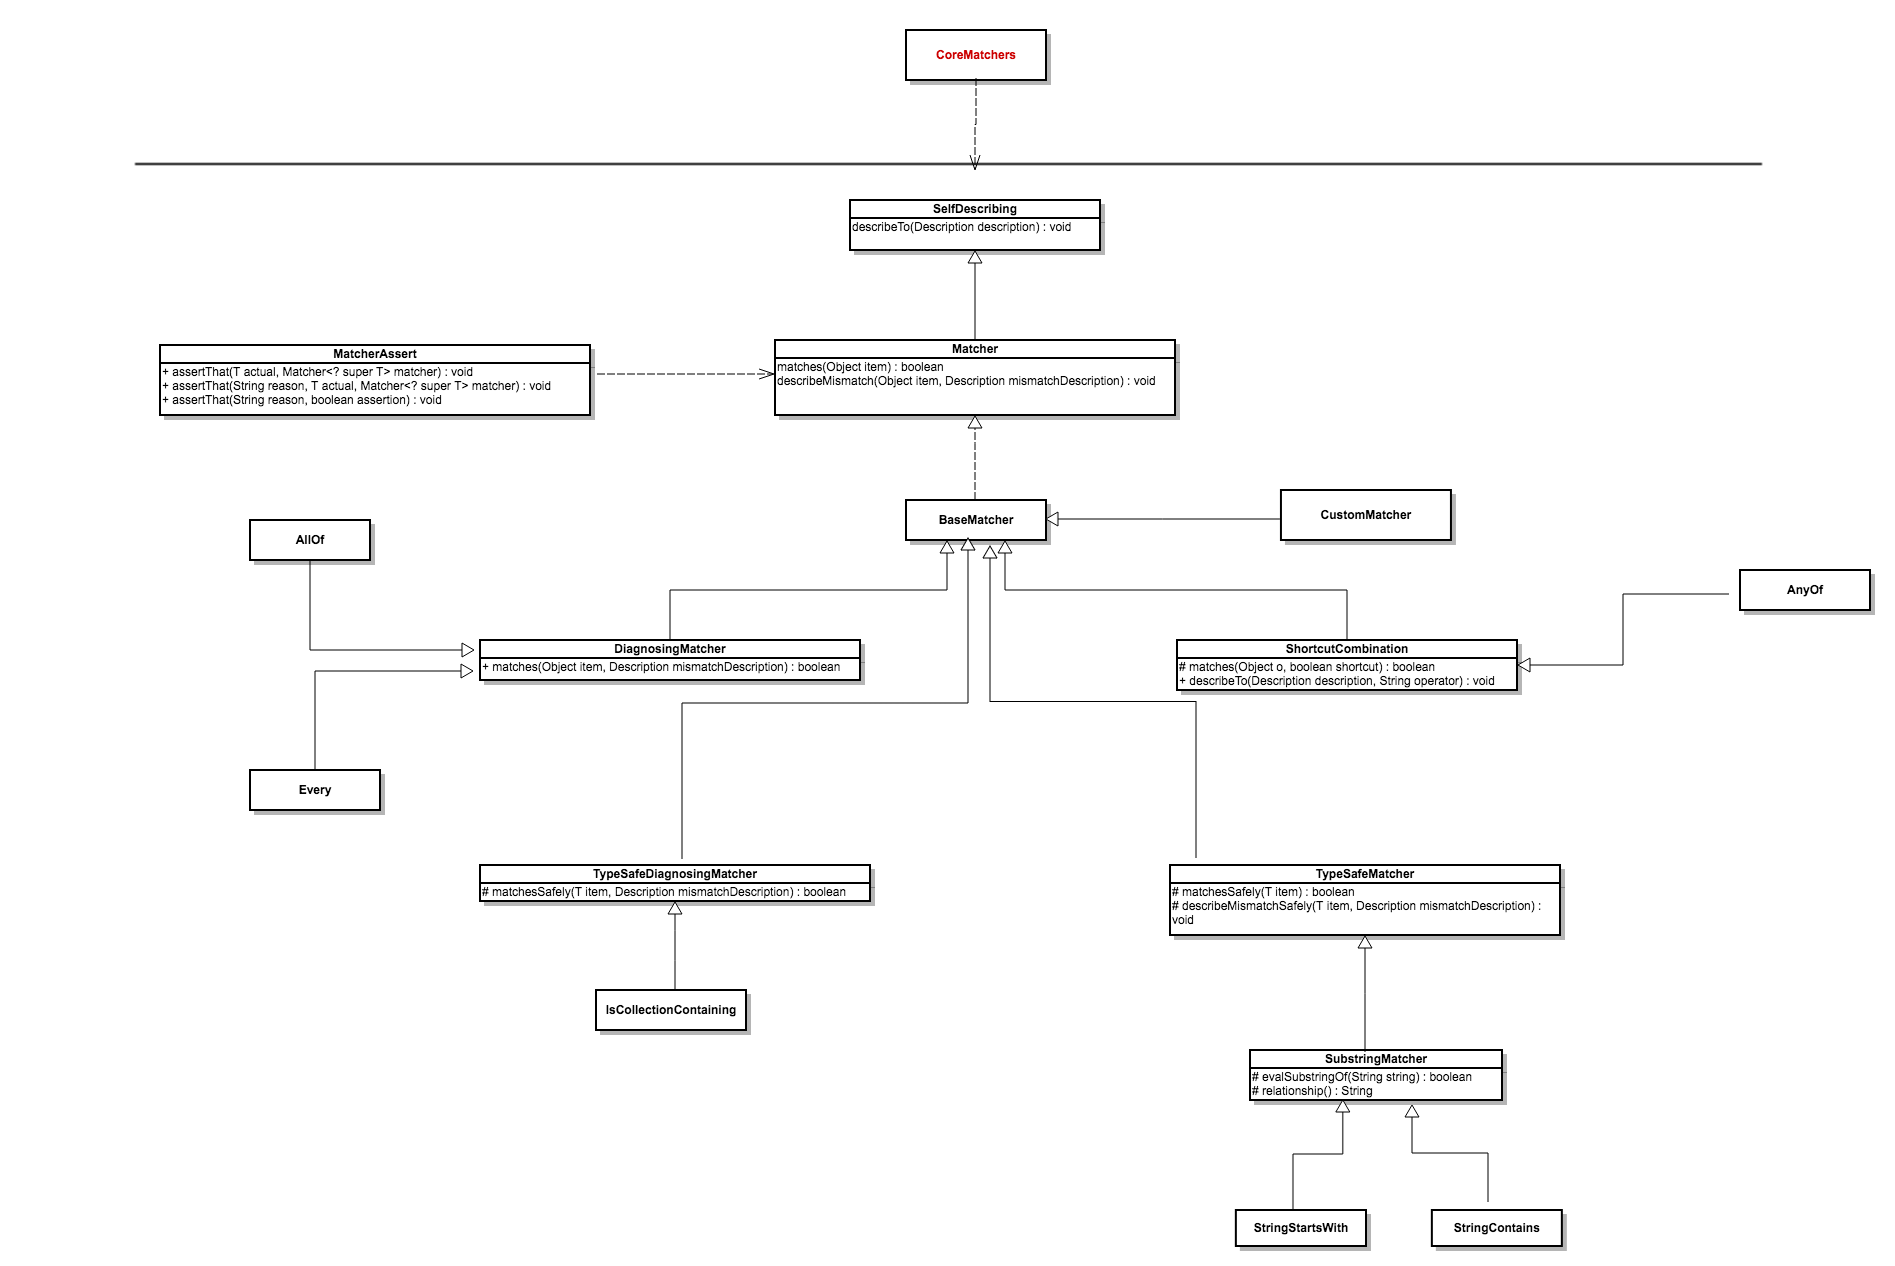
上图仅仅列出了org.hamcrest包下的一部分类,这些类一起组合起来形成了JUnit强大的验证机制。
验证的基本写法是:
MatcherAssert.assertThat("saymagic", CoreMatchers.containsString("magic"));
首先我们需要调用的是MatcherAssert的assertThat方法,这个方法最终辗转为:
 public static <T> void assertThat(String reason, T actual, Matcher<? super T> matcher) {
        if (!matcher.matches(actual)) {
            Description description = new StringDescription();
            description.appendText(reason)
                       .appendText("\nExpected: ")
                       .appendDescriptionOf(matcher)
                       .appendText("\n     but: ");
            matcher.describeMismatch(actual, description);

            throw new AssertionError(description.toString());
        }
}
这个函数目的很是明确,直接判断matcher是否匹配,不匹配则封装描述信息,然后抛出异常。所以我们来关注matcher的matchs方法都做了些什么,CoreMatchers.containsString("magic")返回的就是一个matcher, CoreMatchers相当于一个静态工厂,提供了大量的静态方法来返回各种Matcher:
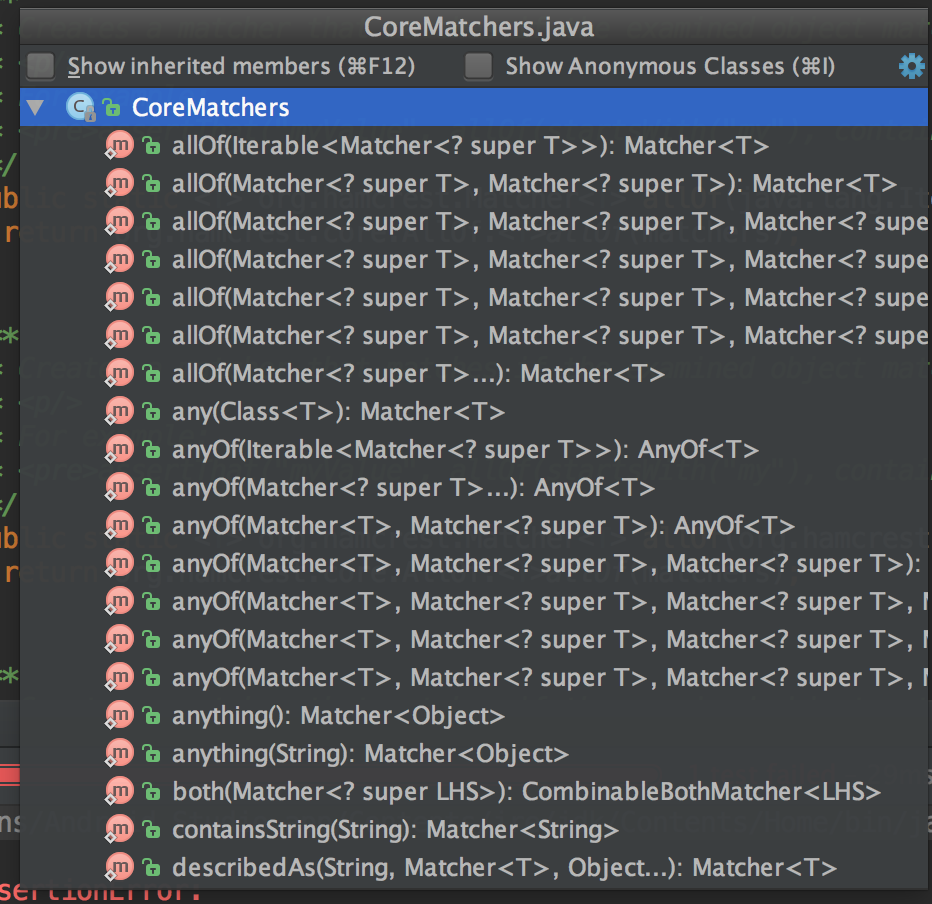
我们就已刚刚的containsString为例,查看其内部代码:
 public static org.hamcrest.Matcher<java.lang.String> containsString(java.lang.String substring) {
    return org.hamcrest.core.StringContains.containsString(substring);
  }
可见其调用了StringContains的一个静态方法,继续追:
@Factory
public static Matcher<String> containsString(String substring) {
   return new StringContains(substring);
}
这里很简单,直接new了一个StringContains实例,StringContains的继承关系如下:
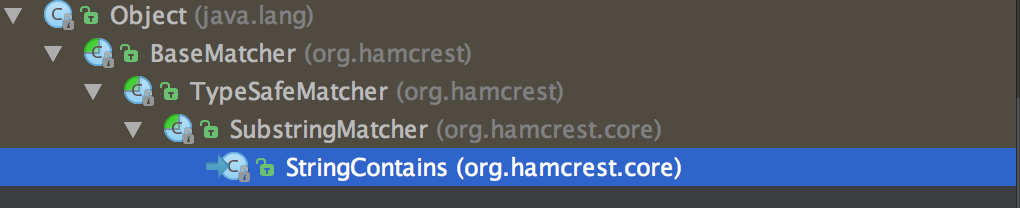
首先BaseMatcher实现了Matcher接口,TypeSafeMatcher是BaseMatcher的一个抽象实现,它的matches方法如下:
public final boolean matches(Object item) {
   return item != null
           && expectedType.isInstance(item)
           && matchesSafely((T) item);
}
可见它在验证前作了判空与类型的校验,所以子类就可以实现matchesSafely方法,就无需在此方法中进行判空与类型的验证了。
SubstringMatchers是TypeSafeMatcher的一种实现,它是对字符串类验证的一种抽象,它的matchesSafely方法如下:
@Override
public boolean matchesSafely(String item) {
    return evalSubstringOf(item);
}
子类需要实现evalSubstringOf方法。如此,我们就可以看下StringContains的这个方法了:
 @Override
 protected boolean evalSubstringOf(String s) {
     return s.indexOf(substring) >= 0;
 }
出奇的简单,并没有什么好解释的。这个如果返回了false,说明验证不通过,前面的assertThat方法就会抛出异常。这样,JUnit的一个测试就不会通过。
assert翻译过来为断言,也就是说,它是用来验证是非的,但我们也清楚,并非所有的事情都分是非,测试也如此,比如我们要测试登录模块,当点击login按钮的时候,可能验证通过后就跳转了页面,并没有任何返回值,这个时候我们往往会验证某个事情发生了,比如login后执行了跳转方法,这样就表示测试是通过的。这就是Mock框架来做的是。感兴趣的可以查看我的上一篇文章Mockito源码解析
总结
读懂JUnit的源码并不是很困难,我相信这与整体架构设计得当有关,使人读起来神清气爽。 此文也仅仅是对JUnit的源码粗略概括,更多的细节还有待大家仔细琢磨。
就是这样,大家国庆节快乐,我要为祖国妈妈庆生了。

on